Pages

Showing posts with label crafts. Show all posts

Monday, November 9, 2020

Just My Cup of Tea

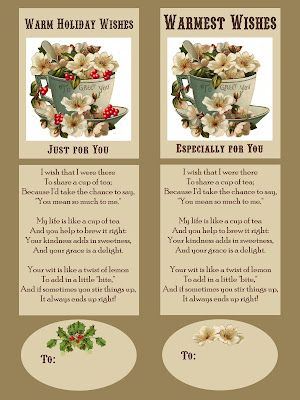
Here is a little printable that would be cute tied to some honey straws, a vintage  teacup, a box of teas, or little infuser and given as a small token of appreciation during the upcoming holidays. It has a sappy poem and a lovely Victorian image of a flower-filled teacup.

When I taught school, I was given so many sweet gifts. Many of them were mugs, and I think I have one of them left. One of my very most favorite gifts was a single, small bottle of "Mexican Coke," which is the Coke (of which I am extremely fond) sweetened with cane sugar. They used to be very hard to find, but I think I saw a six-pack of cane-sweetened Coke in Walmart the other day. 

As usual, click on THIS LINK HERE to download the full-sized file stored in the Google Cloud. If you just save the image below, it will be too small and will not print nicely.

free printable tea gift card hostess


    Kind Regards,

    The Merry Olde Dame


Tuesday, October 20, 2020

Thimble, Thimble

Luckily, much of my recent needlework has been cross-stitching, created with a rounded, blunt needle. But when I pick up regular embroidery, using pointed needles, I also pick up a thimble from my collection. 

tinware with thimbles inside


My favorite is a simple silver-plated thimble from the 1940s. It's very light. Thimbles featuring advertising were popular in times past.

I have a strange connection between my thumb and my nose, which makes me think there is something to acupuncture. If I jab my thumb with a needle, I get an unpleasant "electrical" tingling in my nose and can smell a very strange scent -- a scent I have never smelled except after a jab. So, does a nerve run from thumb to nose, or from thumb to brain and back down to the nose? 

I have enough thimbles to last the rest of my days. I have been to estate sales where the former owner has several hundred thimbles neatly on display in small cabinets. 

Until tomorrow,

    Kind regards,

    Olde Dame Holly Rose

Friday, October 16, 2020

Granny's Depression-Era Make Do Clothes Hangers

My maternal grandmother was a woman of many unusual talents. She had played high school basketball before the turn of the twentieth century, yet she also excelled at all the housewifely arts of sewing, keeping a home, cooking, and gardening. She had chickens and a milch cow, and a garden second only to my own mother's in terms of rare and unusual plants. 

She was six feet tall in bare feet, but we never saw her in bare feet. She always wore heels. Even her slippers were tall heels. She said she had worn them for so long that she could not walk in flats. I thought her very elegant in those heels.

Granny was a magician at the art of making do. These clothes hangers were wrapped with long strips of leftover cloth, and decorated with a gathered cloth flower. And this was done during the Depression, when every last scrap was important and was used. She also made braided rag rugs of all sizes, and her sense of color was astounding.

Depression era make-do handiwork cloth


They say interests tend to "skip" a generation: My own mother did not care for such endeavors. Deeply marked by the privations of the Depression and the shock of World War II, she and my father rarely spent money, but they both preferred to buy, in a very limited manner, our home's decor. I grew up fascinated by my Granny's handiwork, though, and spent many hours embroidering and hand-sewing little items in imitation of hers.

In the rush of my most recent move, I had to leave many things behind. All of my padded hangers, laboriously collected from various estate sales over a period of 20 years, were left. I like the slim profile of the old wire hangers, so I think I may try to wrap a few hangers myself now. 

    Kind regards,

    Olde Dame Holly Rose

Wednesday, October 14, 2020

Crafting Thrift: Strange and Wonderful

I like to go to estate sales (well, I enjoyed going before COVID, since now they are all online in my area), not really to try to grab some fine item at a reduced price, but to look for thrifty crafts of yesteryear. I also buy any lots of old Christmas cards from mid-century to earlier. If they are used, so much the better.

Some treasures bought include long coils of folded and interlocked gum wrappers, bracelets made from fishing lures and uneven old seed beeds, coasters stitched from scraps of calico sewn over several pieces of cardboard, and trivets crocheted around old pop bottle tops.

I like to make these sorts of "treasures" myself; I have always enjoyed these make-do oddities. In that vein, I decided to use the wax rind of a mini gouda cheese to make "berries" for a plain dried twig. It was easy to roll up some little balls and just push them onto the twig here and there. 

Crafting thrift make do's wax berries from rinds.


The other wax rinds were pressed into pinecones from the yard, and the cones put into paper fast food bags. I add a few small twigs into the bag, twist it closed, and I have an excellent fire-starter. I also like to use the spent wax from my tart warmers for these fire-starters.

Do you have any strange and thrifty make-do's from yesteryear or today?

Wednesday, September 30, 2020

Pumpkin-Shrinking Fever!

 Maybe it's a reaction to the COVID shutdown and sadness, but suddenly the crafting/make-do/primitive world has gone crazy for shrinking down pumpkins in the oven, and turning them into hard decorations that evidently will last at least a year!

There is a huge amount of experimenting going on, and even while you're reading this, thousands of pumpkins all across the U.S. are being baked at this moment. All I can say is, before you even start, go get one of those fantastic fried Pumpkin Creme Pies from McDonalds, because if you don't, the smell of baking pumpkin - and none to eat - will drive you to distraction.

The fried pies are great. Better than my pumpkin pie, and it's delectable.

The consensus so far: Use small pumpkins. Use orange ones. Be sure to bake them on a cookie sheet/shallow baking pan. Jack O'Lantern pumpkins seem to do better than pie pumpkins, according to SOME. Don't undercook, and don't overcook!

They are cooked like Lowrider Pumpkins: Low and slow. 

They harden as they cool. Some people are cutting faces into them (don't cut out a nose, because it weakens that side of the pumpkin too much and you get a crack or a collapse), but some are just cutting two small slits in the bottom of whole pumpkins and making no face. Some haven't even cut the slits in.

Here's a screenshot of some instructions for your very own "shrunken" pumpkin:


    Kind regards,

    Olde Dame Holly Rose

Monday, September 28, 2020

Using Magnets to Simplify Decorating Atop Storage Boxes and Baskets

I have a variety of baskets and decoupaged cardboard boxes with hinged lids that I use for storage. I like how baskets look on my tables, desks, and dressers, and they keep the clutter hidden. What I didn't like was how the little decorative items I put on top of them had to be moved and replaced each time I opened the lid and put something in or took something out!

I decided to order some "rare earth" magnets from Amazon. These are the super-strong magnets that can even be used to hold metal tools onto the garage wall. 

I thought that if they were that strong, they'd be strong enough to "grab" and hold my decorations on the top, and allow me to lift the lid without them falling off.

And, it works! Here's what I do to allow me to have decorated storage baskets AND not have to bother with holding or moving my decorative items:


Friday, September 25, 2020

Mixing Fall Scented Wax Cubes

I love to have my wax warmers on several hours each day. I have four, so that the house is covered. I don't always have the same scents in all of the warmers. For the front of the house, I usually have a "welcoming" scent so that guests immediately thing "homey" and "clean." I might have florals in other the other areas.


This time of year, I like to go all-out autumn, with fall scents in all the warmers. I've discovered, since moving away from an absolutely wonderful candle shop in Texas, that I can't quite get the scents I want in my new city. But I've discovered the idea of mixing different wax cubes together to make combinations that mimic the scents I miss.

I found a great Yankee Candle scent at Walmart. Usually, Yankee Candle is a bit pricey, but these were at a good price, maybe because it was in Walmart. It's Sparkling Cinnamon, and if the name doesn't grab you, the scent will. It's like a big sniff of "Red Hots" candies! Also at Walmart, I found Better Homes and Gardens Rustic Woods, and what I think must be an unlabeled Wally brand that says Cozy Bonfire.

I have been combining the Rustic Woods and Cozy Bonfire together. It smells like walking in the woods when the ground has turned hard, and Thanksgiving is around the corner. It almost brings tears to my eyes! There's something so poignant and nostalgic about the smell.

I'm also combining the Sparkling Cinnamon with Rustic Woods. It reminds me of my Granny dropping Red Hots into a cup of hot apple cider for me, both of us sitting and looking at her little wall fireplace in her tiny shotgun house in north Louisiana. Fifty years ago, and I can just smell and taste it again.

Do you have a favorite scent combo for fall?

    Kind regards,

    Olde Dame Holly Rose

Wednesday, September 23, 2020

Tissue Paper Pom Poms from Vintage Sewing Patterns

I am careful about taking apart or using up vintage materials in order to make other crafts. Sometimes I want to leave a vintage item intact, as it's a piece of history. Other times, using the item lets it be seen and appreciated as part of a new whole.


I bought a big box of vintage dress patterns at an estate sale a few years ago, and since then, I have made many a pom pom out of the previously uncut aged tissue. They always get compliments. The best compliment of all is seeing the idea used by others.

To make these pom poms, you'll need an old tissue paper pattern and a piece of wire. You can use chalk on the edges of the tissue, if desired. I usually keep them plain unless it's a retro tea or party and I need to match the theme color of the honoree.

Take about eight to twelve layers of tissue paper and lay them atop one another. Cut out a rectangle -- the size depends on the size you want your finished pompom to be. I usually do somewhere around 15 inches on the short size and 20 on the longer side for a typical pom, or thereabouts. Sometimes I will make two smaller ones (perhaps 10" by 12" rectangles) and a larger one for a grouping. 


Begin to fold them up, along the LONG side, a bit over an inch, perhaps 1.25" folds for the large poms (and slightly less than an inch for the smaller poms). Keep folding them the whole way. You can think about if you want flat ends, pointed ends, or rounded ends at this point, once all the sheets have been pleated. Cut the ends at an angle like a rooftop if you want the points or a semicircle if you prefer the rounding.


Take your bit of wire (or string if you have no wire) and twist it very tightly around the middle of the folded "fan." Leave long ends if you have enough wire, so that you can hang it. Start pulling up a single sheet at a time from one side towards the middle wired area, then the other side. Be gentle but don't worry if something tears, because it will not be noticeable and these are supposed to be rustic anyway. I find I have good luck in slipping my fingers under the pulled up pieces and pushing carefully, kind of wiggling along the pleats, to make the lifted sheets as near to the middle as I can get them. Do one side, then the other.


You can also squeeze or bunch the pleats once half the sheets have been pulled up, before you then flip it over and start pulling the sheets towards the middle from the "other" side. 


Now the pom pom is ready to be fluffed. Just use your fingers to spread, smooth, place or bunch the pleats as needed. 


Simple, and simply pretty!

Do you have a favorite reuse/make do/simple times craft?

    Kind regards,

    Olde Dame Holly Rose

Monday, September 21, 2020

Pumpkin Spice...BOOKS!


This is a cute and thrifty way to decorate for autumn. Many of us have old paperback books that we don't want to reread, and that aren't really in good enough shape to donate. With just a few minutes of effort, they can be turned into charming pumpkins and apples, ready to decorate a book shelf, table, desk, or any niche, really.


First, get the book and remove both covers and the spine cardboard. With a few pages together, start from the beginning of the book and cut the pages to the shape of either a half-pumpkin or a half-apple. After your first pages are cut (they are still attached to the spine), you can trace where they lay on the next page, and pick up a few more pages and cut them along the line you traced. Continue doing this until all of the pages are cut.

Using hot glue, glue several pages lightly at the front and back of the book. Now fan out the book, bringing the front pages around to meet the back ones. Using those two "clumps" of pages, glue the together very well.

You can ink or chalk the edges of the pages orange for the pumpkin, or red for the apple. Add a little stem with a bit of a twig, and a paper or silk fall leaf if you have one, and you're all set to display!


Thank'ee for stopping by.

Kind regards,

Olde Dame Holly Rose