Pages

Showing posts with label food. Show all posts

Wednesday, December 23, 2020

Free Cute DIY Kitchen Gift Idea Printable

If you are in need of a thrifty and useful gift, consider printing out these little little 3x5 measurement equivalency cards and pairing them with a wooden spoon, a jar of spice or sprinkles, even some brown sugar in a Mason jar, and a favorite or interesting recipe.

You can punch a hole in one corner and put them on a ring or tie with baker's twine or raffia. I love thrifty, make-do gifts. Not everyone does, however; I was shocked (decades ago) when my own mother told me in no uncertain terms that she did not like handmade gifts after I proudly gave her a cross stitch creation and a jar of mulled cider spices I had blended. I believe it was partly a reaction to having been young during the Depression; my parents, and many of their generation, bore the scars of severe deprivation. They liked shiny and new, especially my mother, not reminders of lean times.

As always, please use the links so that these print out full size and are not the compressed files you see as images below.

Terra Cotta Tones Link

Mustard Tones Link

Turquoise Tones Link

free printable diy kitchen measurements

free printable diy kitchen measurements

printable free diy kitchen measurements


Thank'ee for stopping by. Almost Christmas!

    Kind regards,

    The Merry Olde Dame, Holly


Friday, December 18, 2020

Simple Gifts: Dried Satsuma Peel

Heigh Ho Ho Ho, Christmas is nearly here. I finally finished up with surgical procedure after procedure last week, and am feeling like myself a bit again. 

The holidays seem to go by in a flash the older I get. And the older I get, the more old memories seem to pop into my mind.

When I was young, the winter holidays meant plenty of citrus where I grew up in the Deep South. My mother grew many different types in our yard, and we would also go buy them from the local groves. Satsumas and kumquats were always my favorites, while my mother loved the huge sweet green lemons that I have not seen since.

Bowls and baskets filled with citrus were on our table and counters during the Christmas season, often nestled in a bed of Loblolly pine boughs. The scent was wonderful and branches of kumquats looked glorious!

Nowadays, bags of "mandarins" are in most groceries. We called them satsumas. I buy them and eat them by the dozens during the holidays. 

Don't let the peels go to waste! Save the peels to dry and put in pretty jars to use during the year and give as gifts.

Dried DIY mandarin orange satsuma peels for simple gifts


Wash any mandarin or satsuma you plan to eat with dish soap, and rinse and dry thoroughly. Wash hands as well, and peel as usual, saving the peels. Using a small paring knife, scrape/cut away as much of the white pith as you can, just leaving the orange part of the peel. 

DIY dried citrus peel christmas gifts recipes


In the desert, we can just place the peel outside in the sun a few days, and have it dry. I usually do a combination of air drying during the day, and then placing in the oven at the very lowest setting, and baking with the door cracked open a bit until completely dry but not browned.

When dry, I place them in a clean jar along with an anti-oxidation packet of silica gel that I've saved from other food packages, such as come in beef jerky packages. You can also buy them. Sometimes I use a bit of coffee filter and wrap up a teaspoon of salt in it, then tuck it down in the bottom of the jar. Another small folded bit of filter goes on top, so that no peel rests on the salt directly.

Cap the jars tightly, tie on a simple ribbon, and they make a lovely gift. They keep their color well and their fresh flavor. I use them year 'round to mince and use in salad dressings and a citrus-oatmeal cookie we like.

Does anyone save peels to use later or dehydrate their own herbs or vegetables? My sister-in-law made lovely soup seasoning mixes with vegetables she dried and blended with spices, long long ago.


Friday, December 4, 2020

"Rompope" - The Eggnog of Mexico

I don't know if anyone has traveled to the Middle East, but one delightful aspect of the region (in olden days, anyway) was the number of almond-based drinks. 

Mexico, too, has a delicious almond-enhanced holiday drink. Yesterday I mentioned Ponche NavideƱo, but instead of that recipe, today I'll post one for Rompope. Rompope is actually more popular than the punch, although both are wonderful. But Rompope should come first, because it's first in the people's hearts.

Here is one old recipe. The main difference between Eggnog and Rompope is the almond meal. I don't know if many people will be making these elaborate Christmas drinks this year, due to COVID-19. They are labors of love that are usually made to celebrate our special guests. Many Yuletide recipes have expensive ingredients (especially so in olden days), and were only made for that special time or for weddings. With so many communities locked down, there isn't as much baking, mixing, and decorating as usual among many. 

You can right-click the image below to save the recipe.

Mexican Eggnog, rompope recipe receta


NOTE: You can substitute pre-ground almond meal for the freshly ground meal the recipe calls for.

Thank'ee for stopping by, and I hope you enjoy. Do you have a special drink for the season? I remember most fondly the Sherbet Island Punch my piano teacher would make for our Christmas recitals. As a preteen and then teen, I thought it most elegant.

    Kind regards,

    The Merry Olde Dame, Holly


Friday, November 13, 2020

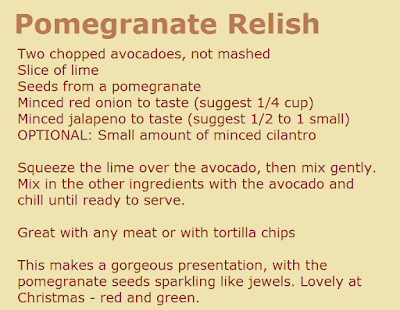
Gorgeous and Delicious Unusual Pomegranate Jalapeno Avocado Relish

Friday the 13th, in 2020. Be careful out there.

Thanksgiving is fast approaching. Many will not be having family get-togethers due to COVID restricting travel and visiting, but if you get a chance to make this recipe, your family will love it! If they serve dip in Heaven, this will be there.

I got this from a co-worker years ago, in the pre-avocado toast days. It was even more unusual then. 

Sorry for the quality of the photo. It dates from years back, too. This first appeared on my old blog, Penniwigs.

I named this blog "The Merry Needle," to reflect my love of cross stitching and freehand embroidery, but I never seem to have time to pick up a needle anymore. Maybe once the holiday season settles in, I will be able to share some of my designs and handiwork. Sitting in a snug chair, Hallmark movie playing, cross-stitching in hand - now, that is truly heavenly!

pomegranate avocado dip relish

picture of pomegranate relish avocado


Thank'ee for stopping by.

    Kind regards,

    The Merry Olde Dame

Wednesday, October 21, 2020

World War II Pyracantha Berry Jelly

pyracantha berries firethorn in autumn fall jelly


Towards the end of the Depression and the advent of World War II, my maternal grandmother and mother would make pyracantha jelly. After the war, she still made it every so often. When I was young, my mother would send me to find and pick the large panicles of elderberries, and to also pick trusses of pyracantha berries. She made more elderberry jelly than pyracantha jelly, but I was more in awe of the pyracantha one. We lived in a new subdivision in New Orleans at that time; it was actually suburban exploration. I would ride my bike for many, many miles, gone for hours, often along the River Road or into Old Algiers, on these errands. Those were different days. 

I was very scared of the large stinkbugs that liked to sit on top of the elderberries, but when sent on an errand, returning without completing it was unthinkable. The pyracanthas meant very sore hands and wrists, because the other name for pyracantha is "firethorn," and indeed their large thorns were quite a painful torment. I had very small hands, so I could avoid many thorns, but not all. I would return with many painful welts.

My mother always said she needed the pyracantha berries not for their flavor, which was bland at best, but for their color. 

During the war, lemons were quite expensive and a treat. This was not an especially cheap jelly for them to have made, due to the cost of the lemon. Sugar rationing also meant this had to be planned for carefully. But the pyracantha berries were free.

Lemons and apple juice were used in my mother's recipe. I have it somewhere, but after this last move, I don't have them "to hand" at present. I do remember that she would seal this particular jelly with melted paraffin, then a lid.

Here is the best I can recall as to her recipe. I do remember that the berries would "pop" when boiled enough, and that she never squeezed or mashed them.

Be careful with any old or untried recipe! Perhaps ask your Cooperative Extension agent -- if they are still extant -- if the recipe sounds safe. Of course, we lived through it, but -- you never know.

Pyracantha Jelly

2 - 3 pounds pyracantha berries
Enough cold fresh water to barely cover the berries
3/4 cup fresh lemon juice, strained (can add more; my mother would often add more to make a more flavorful jelly). Either a big lemon or more than one will be needed.
Apple juice (clear) in case you need extra to make the cooked juice equal 3 1/2 cups
7-1/2 cups sugar
1 package powdered fruit pectin

Wash the berries and remove any stems. Place in large pot (not aluminum). Cover, bring to boil, and simmer about 25 minutes (the berries must "pop their jackets.") You are wanting the juice to be a fine color. Strain juice through a jelly bag or several layers of cheesecloth put over a large fine strainer. DO NOT push or press the berries or you will get cloudy jelly and maybe bitter, too. Measure the juice you have. You will need 3 1/2 cups. Add apple juice to the pyrancantha juice, if needed, to make the 3-1/2 cups. Take your lemon(s) and roll them hard on the counter. Roll and roll them, pressing on them, but don't split them. Now they will "let go juice" more easily. Cut in half and get the juice. Add the lemon juice and pour it all into either another clean pot or the pot you were using that you have rinsed.

Stir in the sugar as the juice heats and bring to a good boil, stirring constantly. Skim any additional foam that forms, then add the pectin. Keep stirring and bring to a full rolling boil and boil hard about 3-5 minutes. Remove from heat, skim and ladle into hot sterilized jars. Top with melted paraffin. Makes about five 1/2-pint jars.